This is my custom keyboard layout
I have been meaning to make this post for some time now. A big reason for why I like custom built keyboards is being able to use the open source QMK firware. It’s a firmware written in C and it let’s me customize the layout just the way I want it.
Layer 1 - The default layer
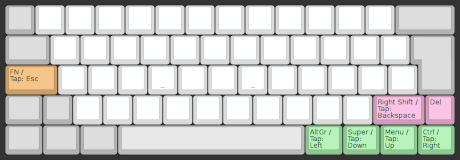
This is the default layer where I have all the keys you expect to find on a keyboard. I have blanked out the layout and only included the changes I have made to it.
The orange button where you normally find Caps Lock is where I have a primary layer tap key. This means that when I tap that key it will functions as the Escape-key and when I tap and hold it will act as my FN1-key and activating my secondary layer.
The left pink key is a modifier key that works as Backspace when tapped and then function as Right Shift when tapped and held.
The green keys a set of modifier keys as well. They work as a extra set of navigation keys when tapped and then as the regular keys when tapped and held.
Layer 2 - The secondary layer
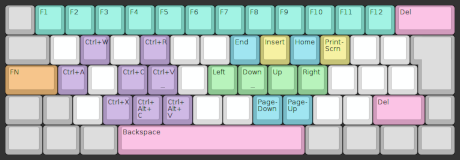
This is my secondary layer. I can probably seem a bit overwhelming with all the colours, but it’s actually pretty simple and it’s at least logic to me.
The purple keys are what’s called chained keys. This means that when I use the key kombination FN+C it will act as Ctrl+Alt+C. This eliminates pretty much all my use of my regular Left Ctrl-key and most of my hand movement.
Layer 3 - The numpad layer
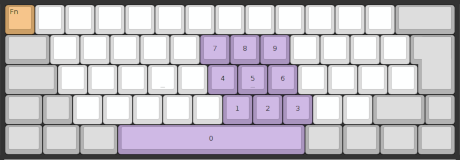
This is my third layer where I have my numpad keys.
I have an external numpad, but I lent that to my mom who had greater use of it than me. With both a regular keyboard who has a numpad cluster and with an external numpad there’s a lot of hand movement. I don’t like that. With this layer I can access the numpad whenever I want to input a lot of number without moving my hand at all.
If this looks interesting I suggest you checking out the documentation.


Comments
There's no comments for this post. Use this e-mail form if you would like to leave a /public/ comment on this post. Or simply send me a private e-mail message if you have any feedback, or just want to say hello.